Since the 12th of October, myself and the rest of the class were set a task by our tutor Tony. The task was to design an environment using 3D modelling techniques. This would be a render that we would later texture or paint over in Photoshop. The theme we were given was Norse Mythology mixed with future technology.In this blog I’m going to be talking about the research and Mood board I did for this project and in the following blogs I’m going to be talking about some concepts I had for my environment and the overall build and my personal evaluation on the project. First of all your probably wondering, what is Norse Mythology? Well Norse mythology is the body of mythology of the North Germanic people stemming from Norse paganism and continuing after the Christianization of Scandinavia and into the Scandinavian folklore of the modern period.
So now that you’re filled in, I’m going to talk about different parts of Norse mythology including Gods and other myths. Firstly here’s some of the Norse Gods and a bit about them.
Odin Odin is the chief divinity of the Norse pantheon, the foremost of the Aesir. Odin is a god of war and death, but also the god of poetry and wisdom. He hung for nine days, pierced by his own spear, on the world tree. Here he learned nine powerful songs, and eighteen runes. Odin can make the dead speak to question the wisest amongst them. His hall in Asgard is Valaskjalf (“shelf of the slain”) where his throne Hlidskjalf is located. From this throne he observes all that happens in the nine worlds.
Balder The god of light, joy, purity, beauty, innocence, and reconciliation. Son of Odin and Frigg, he was loved by both gods and men and was considered to be the best of the gods. He had a good character, was friendly, wise and eloquent, although he had little power.
Frigg As the wife of Odin, Frigg is one of the foremost goddesses of Norse mythology. She is the patron of marriage and motherhood, and the goddess of love and fertility. In that aspect she shows many similarities with Freya, of whom she possibly is a different form.
She has a reputation of knowing every person’s destiny, but never unveils it. As the mother of Balder, she tried to prevent his death by extracting oaths from every object in nature, but forgot the mistletoe. And by a fig made from mistletoe Balder died. Her hall in Asgard is Fensalir (water halls).
Thor Thor is the Norse god of thunder. He is generally depicted as red-headed and bearded. He is a son of Odin and Jord, and one of the most powerful gods. He is married to Sif, a fertility goddess. His mistress is the giantess Jarnsaxa (“iron cutlass”), and their sons are Magni and Modi and his daughter is Thrud.
Thor was usually portrayed as a large, powerful man with a red beard and eyes of lighting. Despite his ferocious appearance, he was very popular as the protector of both gods and humans against the forces of evil. He even surpassed his father Odin in popularity because, contrary to Odin, he did not require human sacrifices.
Loki The most unpredictable and certainly the most dangerous god in the Northern pantheon was Loki. His activities ran from the merely mischievous to the blatantly malicious. Supremely clever, Loki ensnared everyone in complicated problems, to which he always supplied a remedy – through his solution often engendered even greater troubles. Loki is an immensely powerful magician, and shares with Odin the ability to sex and shape shift at will.
Now onto some popular myths and legends.
The Aesir In old Norse Mythology the Aesir are the principal gods of the pantheon. They include many of the major figures, Odin, Frigg, Thor, Balder and Tyr.
A second clan of gods, the Vanir, is also mentioned in the Norse mythos. The god Njord and his children, Freyr and Freyja, are the most prominent Vanir gods who join the Aesir as hostages after a war between Aesir and Vanir. The Vanir appear to have mainly been connected with cultivation and fertility, the Aesir with power and war in the duality of mythology.
Mythology follows the patterns of birth, death, and rebirth in the alchemy of time and consciousness created by the patterns of Sacred Geometry – the Golden Ratio. The formula, which creates the lessons are about duality, with the god and goddess pantheons, as well as the human DNA experience.
Yggdresil Yggdrasil is a gigantic tree, thought to connect all the nine worlds of Norse cosmology. It is often suggested to be an ash tree, an interpretation generally accepted in the modern Scandinavian mind.
Ginnungagap Ginnungagap was the vast chasm that existed between Niflheim (Land of Mist) and Muspelheim (fire giants) before creation. To the north of Ginnungagap lay the intense cold of Niflheim, to the south the insufferable heat of Muspelheim. At the beginning of time, the two met in the Ginnungagap; and where the heat met the frost, the frost drops melted and formed the substance eitr, which quickened into life in the form of the giant Ymir, the father of all Frost giants. See his entry for the continuation of the Old Norse story of the Creation. It is similar to Chaos Theory.
Ragnarok Ragnarok is also known as the final battle, equivalent to Judgment day in the battle of good and evil, when balance is restored and a new creation begins.
After finding out some interesting facts about Norse Mythology, I then went on to create a mood board full of reference material that I could use for my concepts later on down the line. In the mood board I included many different images of Norse Gods and viking weaponry (due to these gods being worshipped by vikings). I mainly focused on Thor because I really like how he is portrayed, not only in the media but also in Norse Mythology, not to mention his almighty hammer! When adding images of futuristic technology to the mood board I mainly referenced movies such as Star Wars and Star Trek and so on, as I believe that Lightsabres, Blaster pistols, Phasers and Star fighters are way ahead of their time and would also take the human race generations to develop the technology in my opinion, so therefore I consider them to be futuristic technology.
 I also decided to put images of Virtual Reality devices on the mood board also, due to the fact of these also being futuristic tech, in a sense that they are always evolving.
 The full mood board is shown below…
 Overall I really enjoyed researching Norse Mythology as it gave me a better understanding of what Norse Mythology is as a whole. It also gave me brand new ideas for concepts for my environment, which I will talk about in my next blog.

 So as you can see, our first week would be focused on Planning and if we got round to it, make a start on modelling. I didn’t get onto modelling this lesson however I gathered a ton of reference material for my model. Speaking of my model, I’m going to be creating my own unique character in a cartoony type style, mainly because I really like the style and the over exaggeration of facial features and so on.
 I decided to build up a reference bank in a Power Point document, this was so that I could keep all my references in one place and manage my reference images as much as I wanted and also so that I didn’t have to create several different mood board documents in Photoshop.
 Well over the past week, I’ve produced a few sketches that I will use as inspiration for the environment build before painting.
 SketchBook Express for those who don’t know, is a free sketching app which can be found on the app store. I don’t quite know what it was that possessed me to create these concepts in this program, I guess I just wanted to create the sketches digital for a change, why not eh?
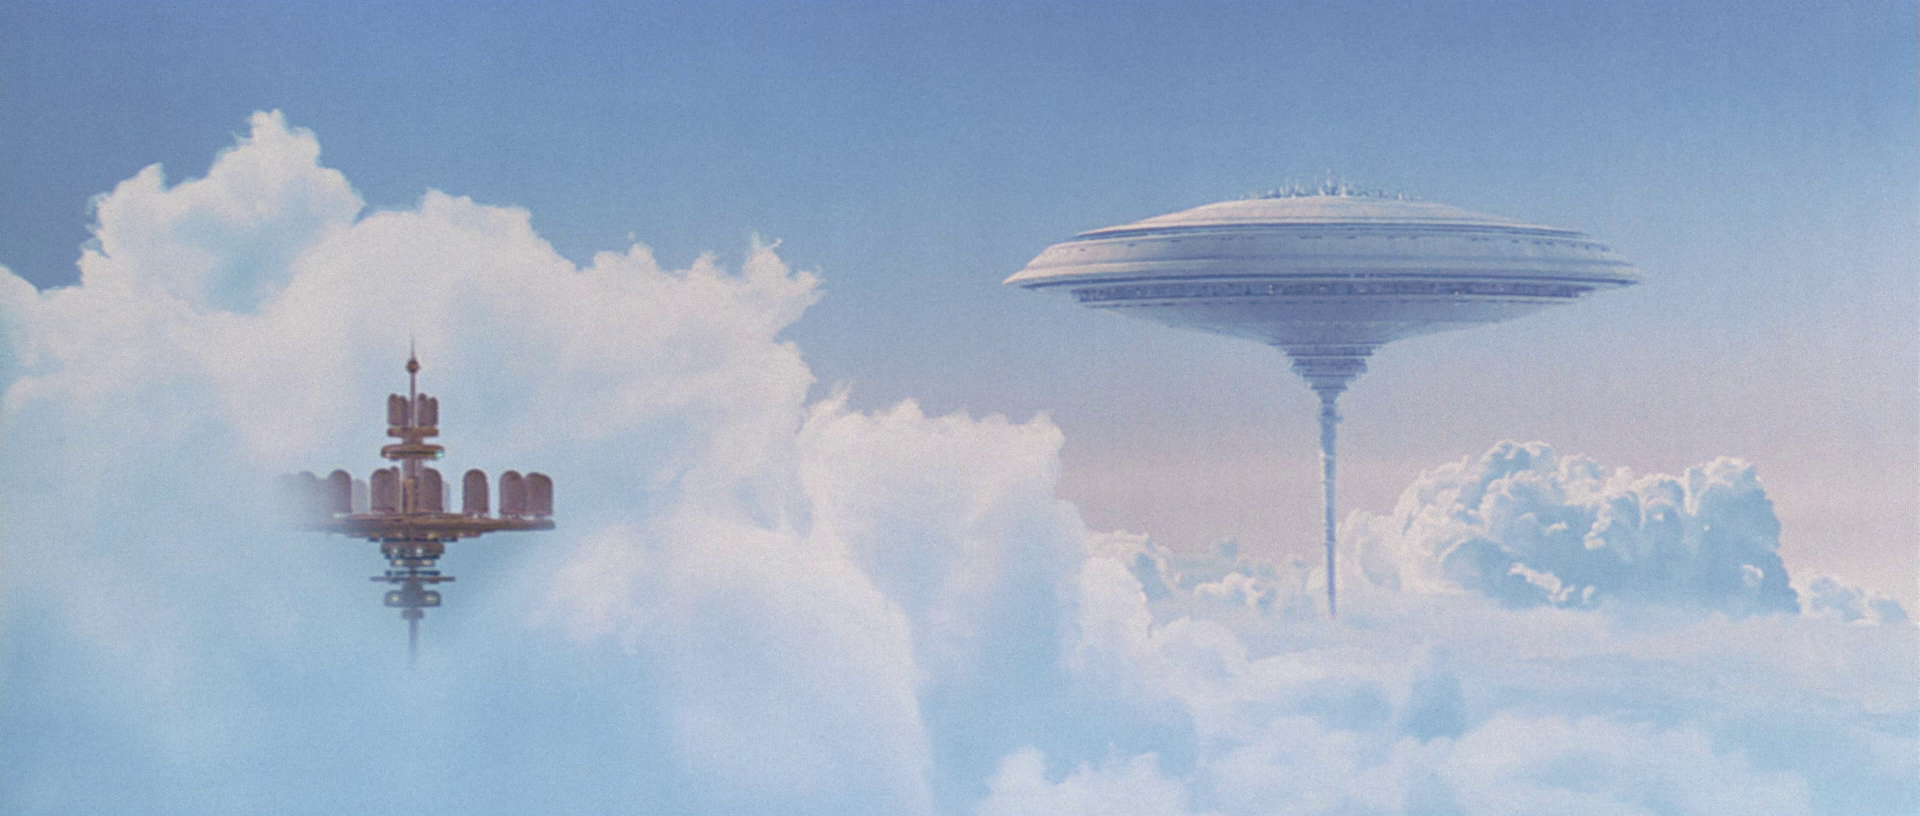 Anyway heres the sketch…


 With After Effects it’s the same sort of principle. After effects has a range of built in plug-ins such as CC Particle Systems II, CC Particle World and Particle Playground as well as other similar plug-ins such as CC Snowfall which you guessed it, simulates snowfall. A good example of how the particle effects could have been used is in the Netflix original series Stranger Things, mainly during the Upside down scenes where a dust/snow-like effect is used…
 Anyway let’s get started. To start with I opened After Effects and created a new composition. Once I had done this I then created a solid and added a gradient overlay to the solid. For the overlay colours, I decided to use a blood orange type colour and yellow, because I wanted to create a sort of ember type particle. Anyway once this was done I then set the overlay style to Radial giving me the result shown below…
 Now it was time to get started creating the actual particles. Out of the many Plug-ins that After Effects had to offer me, I decided to use the CC Particle World plug-in and I used the settings shown below…
 I then added motion blur on the layer and all together, the overall product looked very nice. The overall product is shown below…
 In conclusion, the effect didn’t come out quite as I had planned. Instead of it being similar to an ember type particle, it looked more similar to rain. However either way I thought that the end result was satisfying. I really enjoyed working with Particle effects today because it’s given me a better understanding of the built in tools in After Effects I can use and how I could use them to my advantage.
 The challenge they had set for us was called the ‘Lunch Crunch’. This was a 3D Sculpting challenge that we had to complete within 2 hours. The only rule was that we had to start from a sphere, no pre-made models were allowed. The theme was ‘Celebrate Your Unique Talent’.
 Your probably wondering, what’s this go to do with the theme of ‘Your Unique Talent’? Well recently I had decided to re-visit my old consoles from my childhood such as the PS1 and the PS2, and one of my favourite games that I played as a kid was MediEvil, however I could never complete it due to some of the graphics scaring me as a child. But since I revisited the game, I had overcame my fears of the game and I am actually insanely good at it, a talent you could say. And that Ladies and Gents is how I interpreted the theme. So I decided to sculpt the Head of Sir Daniel Fortesque, mainly because I love his cartoony design and over exaggerated features.
 I really liked the first reference I picked out as It showed me pretty much every view of Sir Dan’s head, so I used this as the main reference for this piece. Anyway to start with, I started off with a sphere just like Framestore insisted we do…
 I then used the grab tool to manipulate the sphere to get the shape of Sir Daniel Fortesques head. Then I flattened the parts I grabbed out for the front of the head and I got the shape shown below…
 At first glance, the model so far looks like E.T the extra-terrestrial, and obviously I didn’t want that. So I started to use the grab tool to make the brow bones of Sir Dan more prominent and brought out his upper jaw and made the underneath of his eyes sockets more prominent also. As well as this I created the eye sockets by using the Grab tool as well, being careful as I went along. The sculpt ended up looking like this…
 I then went on to adding in his eye by creating a new sphere and placing it in the right socket, this was because I wanted it to look as close to the reference as possible…
 Finally, I created Sir Dan’s teeth. To create his teeth I created a new sphere once more and manipulated the sphere with the grab tool until I thought it looked right. I decided to only create a tooth and duplicate it so that I could change the scale and position so that the teeth in the set looked different, also modelling each tooth would be time consuming and with us only having a certain amount of time left, I felt like the method I used was efficient.
 After putting the teeth in place and everything was done, I exported the sculpt and uploaded it to the Next Gen Portal. The final OBJ render is shown below…
 Overall I was really happy with my sculpt and as I side project I intend to texture/paint the sculpt so that it has a bit more character to it in the future. I also look forward to other projects like this in the near future.
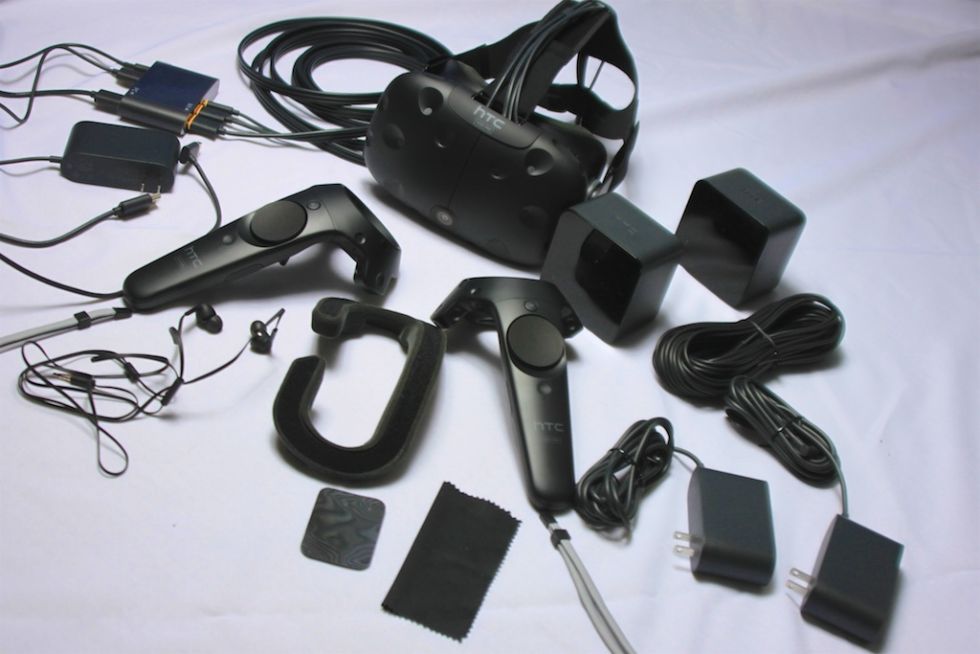 Just as a little bit of a backstory, the HTC Vive is a virtual reality headset developed by HTC and Valve. This Headset (just like the PS VR) was released fairly recently on the 5th of April this year. This headset is designed to utilize “room scale” technology to turn a room into 3D space via sensors, with the virtual world allowing the user to navigate naturally, with the ability to walk around and use motion tracked handheld controllers to vividly manipulate objects, interact with precision, communicate and experience immersive environments. The Vive also has two motion controllers (similar to the Playstation Move) that can be used with the headset.
 The headset itself was extremely comfortable and I honestly faced no major issues unlike the fidgeting of the PS VR. However one thing that really irritated me was the cables coming from the back of the headset, my lord the cables! The cables got in the way a lot and with the player being able to freely walk about space, this could be a real issue without proper cable management. However when I tested the Vive, I had my friend Louis to watch the cables for me and move them around if they were in a hazardous position whilst I was playing.
 The gameplay was amazing! Unfortunately I didn’t manage to capture any gameplay from the Vive due to the college not having any screen recording software for the PC, but trust me it was unbelievable!
 Honestly when playing this I was overwhelmed with happiness and joy due to me being a huge Star Wars fan. Just being able to see the two suns of Tatooine made me giggle a little and the attention to detail to this game was amazing! Also being able to wield a lightsabre had to be the highlight of this game! Just being able to deflect shots back at Stormtroopers with your lightsabre was just incredibly awesome! It almost felt real!
 This game absolutely terrified me! The zombies were coming at me in 3 different rounds. The rounds got more intense as the game progressed and I actually got scared at the fact for the first round all I had to defend my self was a machete! A couple rounds later, a jump scare occurred…
 Yep, that’s me in the gif, getting the heck scared out of me. Not my proudest moment of course, but it definitely made the experience even more intense and terrifying for me. And again the attention to detail in this game was amazing! At one point it actually felt as though a zombie was breathing on me because they got that close!
 As I mentioned in my previous blog, I thought that the PS VR gameplay could’ve definitely been improved if the motion controllers were combined with the headset. And the Vive definitely proved me right in that respect. The gameplay felt so much better now that I had the Vives motion controllers in my hands. Just being able to feel as though I was holding a lightsabre in my hand made the experience much more greater for me. I do believe that being able to reload a pistol and hold a lightsabre made the experience a lot more immersive then just using a controller. Also the vibrations in the controllers when reloading the pistol and unsheathing the lightsabre made the situations I was in more realistic then I though they would be. Also being able to move around the game world whilst moving around in real time felt awesome as well as it didn’t just restrict me to sitting in a chair unlike the PS VR.
 Overall I felt that my experience with the HTC Vive was so much better and immersive than the PS VR, sorry Playstation. Everything just felt more fluent and great with me being able to move around a space with motion controls. And once more, I managed to take away a great, comfortable user experience. Just like the PS VR, I definitely think that this headset is an amazing piece of tech, especially with the motion control combo. The graphics were also fantastic and the use of sounds were unbelievable! I really think that other companies can learn from this headset and its use of motion controls, to achieve a satisfying, immersive and breathtaking experience for the consumer.
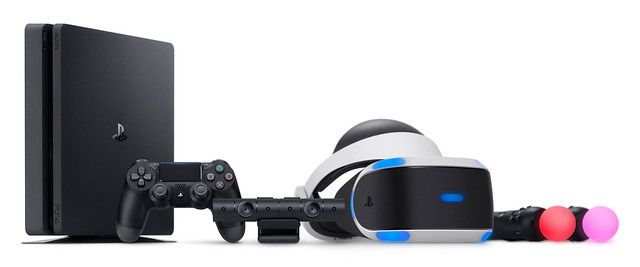 So for those of you that don’t know, the Playstation VR (also known as Project Morpheus during development), came out fairly recently launching on the 13th of October 2016. The PS VR is a Virtual Reality Headset developed by Sony, exclusively for the PS4 system. And with any VR Headset, it allows you to engage the games world from your own POV.
 Now onto Gameplay. Like with any headset, the gameplay has to be enjoyable and has to keep the user engaged to give them the best experience possible and honestly, I thought the gameplay was fantastic! I managed to get some footage from the PS VR and threw together a little edit to show off the gameplay. Be sure to click on the video to watch some of the gameplay I captured!
 Drive Club VR for me was a great experience and I must say that with me playing the original game (which wasn’t very good in my opinion), the VR version of the game is a huge improvement! Everything feels so much better in the Virtual world and to actually feel as though your in the car itself is so great. And to experience the scenery in the game like your actually there is unbelievable.
 EVE Valkyrie was also an amazing experience for me. I really enjoyed being inside the cockpit of a spaceship during outer space warfare even though sometimes it was a bit unsettling when doing barrel roles! Also being able to see your own body in the cockpit whilst flying and dog-fighting really created an amazing immersive experience for me! I wish that they did this for Drive Club VR instead as appose to just showing the player there hands, which i believe would enhance the user experience.
 I also got to play other games such as Playstation Worlds (mainly The London Heist mode), Battlezone and Headmaster.
 I definitely think that all of the games I played (excluding Headmaster, as that is mainly about using your head movement to header footballs into a goal) could be greatly improved if we had the Playstation Move and VR combination because for some games like Playstation Worlds, I found it really difficult to control weapons and other in game objects.
 Overall I felt that my experience with the PS VR was amazing, due to this being my first step into VR gaming (with it being the first headset I’ve actually tried). Obviously there are downsides to the headset, mainly just the fidgeting of getting the head set just right and also the design is slightly odd but apart from that, I managed to take away a great, comfortable user experience. I definitely think that this headset is an amazing piece of tech and for this being exclusive to the PS4 console, it surprised me of how good everything turned out. The graphics were crisp and the sounds were unbelievable and sounded almost too real when I put headphones on! I really think that this headset can revolutionise VR gaming in the future.


 So to start off with, I began to model the torso of the character by using a technique known as ‘Box Modelling’: this is basically the practice of extruding from a box and creating the basic shape of a character. As I went along, I slightly adjusted verts on the model so that it shaped the character roughly to my liking.
 Once this was done, I then went on to half the torso so that later on I could mirror the geometry of the model then attach it when I thought I would need to. Soon after, I started to create the arm and hand of the character by extruding from the top side of the torso. As you can see, I didn’t model each individual finger, but instead gave the character a mitt for a hand so that I could later texture the hands onto the character.

 I then started to move upwards and create the head. I did this by extruding up from the neck I had previously modelled and extrude outward. After manipulating edges and verts I had eventually got the shape I had hoped for, it mightn’t look like much at the moment, however it should be easy to smoothen out the edges when I take this into Mudbox later.
 Anyway, I then started to create the characters legs by again, extruding. Once more, I adjusted the verts of the character so that the shape of the character was starting to form. When adjusting the verts I kept the shape of the legs in mind and was sure to replicate the thigh shape as best as I could…
 When it came to creating the lower leg, I firstly extruded from the thigh inserting edge loops for the knee and then another to show where the foot would be…
 Then I extruded out from the side of leg creating the foot like so…


 And then I selected the necessary verts and merged them together with the “merge to center” tool, giving me this result…

 I did this for the rest of the corners and adjusted verts in top view to make the corners look as straight and tidy as possible.
 Then I doubled the amount of edge loops on each face so that I could add little indentations in…
 I also decided to add indents on the top and bottom of crate just to add more detail to the high poly piece…
 Once I was satisfied with my crate, It was time to start baking the normal map. However before I started to bake, I had to make sure that both my Low and High poly crates were at the same point and that the Low poly version of the crate was inside the High poly crate, like so…
 I then went over and clicked on transfer maps so that I coukd begin baking…
 Soon after, I started to bake the normal map using the settings shown below…


 I also set the envelope of the bake to be just a tad bit larger than the Low Poly model, so then I could get as much detail on the low poly model as possible.
 I waited a few minutes and the crate was baked…
 Which overall produced this normal map for me…
 Personally, I thought that the baking process was fairly successful, however due to the silhouette of the Low Poly crate being different to the High Poly crate, it caused the Normal map to come out slightly off, however it still worked, just not as well due to the silhouette. Overall I actually really enjoyed this session and I really enjoyed Baking and creating normal maps in Maya and also I really think that this will help me out a lot down the line when I come to do more models in Maya.
 Normal mapping is a technique used for faking the lighting of bumps and dents in a 3D Model. It is used to add details without using more polygons. A common use of this technique is to greatly enhance the appearance and details of a low poly model by generating a normal map from a high poly model or height map, this process is known as ‘Baking’.
 Like a bump map, displacement maps are in grey-scale, in which store height information. These maps physically displace and effect the geometry of the mesh on which it is applied. So unlike bump maps and normal maps, displacement maps can cause deformations to your model, therefore can do everything that changes in real geometry can do, such as casting shadows.
 A Bump map is a greyscale image, similar to a displacement map. Bump maps also manipulate the normals of an object to create the illusion of Bumps and Wrinkles. Bump maps do not add geometry and the therefore keep low poly counts.