
Today, I did more work on our VFX Shot. However, today I focused on creating a green screen asset for our VFX Shot. I did this because when we were first planning our VFX Sequence, we had an idea of a spaceship abducting a student, before attacking the camera and ending the scene. This idea was later scrapped, due to the fact that we didn’t think that we’d be able to film this in the time we had. Obviously, I thought that this was a great idea and I was gutted when we decided to scrap the idea. However, recently I came up with a way which the scene could still be included and could be implemented into the scene simply. So as some of you may know, I’ve been planning my GTA VFX Short film for a while now and I’ve been testing out different ways in which I could make my idea do-able and how I could set up a good scene with lighting and so on. Whilst playing about with the game to see how I could create a good cinematic piece with it, I realised that I really liked the rag-doll physics that is applied to a character when they are falling. I decided to use this to my advantage and in order to set up a green screen asset for our VFX Shot.To start off with, I went into the Rockstar Director Mode in Grand Theft Auto V and set up the lighting and weather in the game world, so that they were similar to the lighting and weather of the footage I had previously captured. The settings I used are shown below…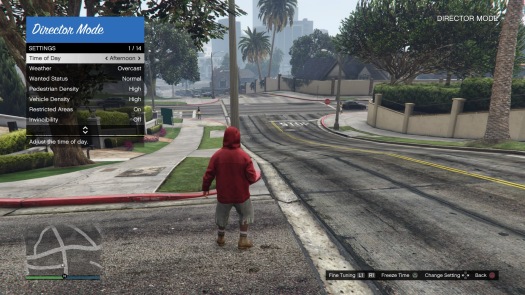 Next I went on to record some footage of 3 different characters falling from a reasonable height, so that I could make 3 different falling assets and also so that the rag-doll physics could go wild whilst they were falling. The pieces of footage I recorded were recorded and put together in the Rockstar Editor and are presented in the GIF below…
 I decided to go with the 3 models shown above, so that it gave more variety of the characters being abducted, instead of just having the one character.The best thing about using the game to simulate the falling animation is that firstly, the rag-doll physics make it so that the characters movement, when falling, would result differently each time and also it took only 5 minutes to set up a suitable camera angle, so that the scene looked nice and so that the camera wouldn’t move around too much when I brought the footage over to After Effects.
Anyway, once the footage was exported, I brought the footage of the characters falling into After Effects. From there, I went on to create a new solid layer, that was a bright green colour, similar to the colour of a green screen and then I went on to place the solid behind my footage like so… I then went on to duplicate my footage so that I could create a mask that would fit around the character from the scene and I used the duplicated layer as a guide for if I missed any parts when masking, just so I could get the best quality mask possible.
 So far, I have almost completed one of these assets and at the moment, the asset looks like this…
 Ideally, I would chroma key the footage later on, once the scene has the new spaceship model implemented into it, so that I can then key frame the footage of the character going up into the spaceship so that the footage gives off the impression that the character is getting beamed up into the spaceship. Overall, I am happy with this so far, as I think that this will make a great addition to the VFX Shot once this is implemented into the scene and I also feel as though this has boosted my rotoscoping skills as well.
